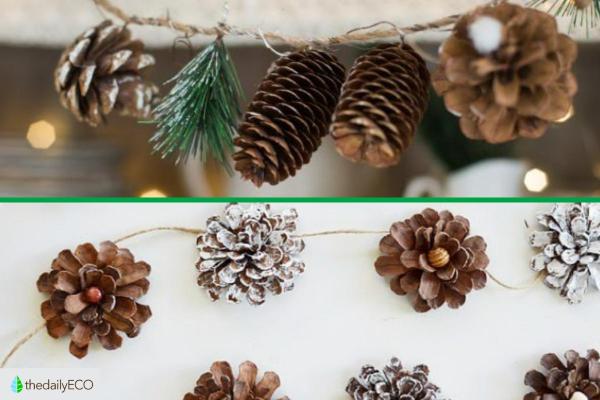
Looking for creative, budget-friendly Christmas decorations that bring natural charm to your home? Pinecones offer the perfect solution! These versatile natural treasures can be transformed into stunning holiday decorations that complement any decor style, from rustic to elegant.
In this article by thedailyECO, we'll show youwe'll show you how to make Christmas decorations using pine cones through five simple yet beautiful DIY projects that turn ordinary pinecones into festive decorations.
How to choose pine cones for Christmas decorations
When collecting pinecones for decorative crafts, follow these responsible practices to protect the environment:
- Choose only fallen pinecones that are fully open and have already released their seeds (pine nuts). This ensures the seeds remain in the ecosystem where they're needed for forest regeneration.
- Collect in moderation, take only what you need for your project. Pinecones play vital roles in the ecosystem because they provide food for wildlife and contribute nutrients to the soil as they decompose. You can also gather a few fallen twigs and leaves to complement your decorations, always being mindful to minimize your impact on nature.
Before starting your craft project, gently clean your collected materials to remove dirt and debris. Did you know there are over 120 species of pine trees worldwide? Each produces uniquely shaped pinecones. Explore these trees in our other article.
How to create a Christmas pinecone centerpiece
This eco-friendly holiday decoration is perfect for family crafting time. You can create something new or refresh an older centerpiece using natural materials and simple craft supplies.
Materials needed:
- Base: choose a hard foam block, tray, or plate.
- Natural elements: gather pinecones, twigs, dried leaves and moss.
- Decorative items: you cna choose anything from long candles to ribbons and bows.
- Craft supplies: make sure to use non-toxic glue, paint and glitter.
Instructions:
- Prepare your base: start by selecting your foundation, it can be either a foam block, tray, or plate. If you're using foam, you'll need to secure materials firmly into the surface. For flat bases, use glue or string to create a stable surface that can be placed on a plate or tray. Once your base is ready, cover it completely with a layer of moss, twigs, and dried leaves to create an organic, textured foundation.
- Prepare your pinecones: before assembly, decide whether you want to keep your pinecones natural or add decorative elements. For a festive look, paint them with holiday colors like green, red, gold, or silver. You can also add glitter for extra sparkle. Make sure to let all decorated pinecones dry completely before moving on to assembly.
- Assemble the centerpiece: begin the final assembly by arranging pinecones around the outer edge of your prepared base. Leave a clear space in the center where you'll place your candles. If any pinecones or candles feel loose, secure them with a small amount of glue. Complete your centerpiece by weaving ribbons through the arrangement or adding decorative bows as final touches.
Always ensure all craft materials are non-toxic, especially when crafting with children.
This project is perfect for repurposing old decorations or creating new family traditions. The final result makes an elegant holiday table centerpiece that celebrates natural beauty with festive flair.

How to create a pinecone garland
Transform clean, dried pinecones into charming holiday garlands perfect for decorating your Christmas tree, walls, corners, or fireplace mantel. This simple, budget-friendly project creates beautiful natural decor.
Materials needed:
- Clean, dried pinecones
- Small screw eyes (eyebolts)
- Ribbon or cord (in natural or traditional Christmas colors)
Instructions:
- Preparation: screw one eyebolt into the base of each pinecone, ensuring it's firmly secured. This will be your attachment point for the garland.
- Assembly: thread your chosen ribbon or cord through each eyebolt. For hook-style eyebolts, you can simply thread the ribbon through each hook. Space the pinecones evenly along the ribbon - anywhere from 5 to 20 centimeters apart, depending on your preference.
- Design tip: while you can paint the pinecones, consider leaving them natural for a rustic, organic look. Choose ribbon in either natural tones or traditional Christmas colors to complement the season's decorations.
This simple garland creates an elegant holiday decoration that emphasizes natural beauty and pairs well with any Christmas decor style.

How to create pinecone tree ornaments
Transform pinecones into elegant holiday decorations with these two festive designs for your Christmas tree.
First, let's start with the glittered pinecone ornaments.
Materials needed:
- Clean, dried pinecones
- Strong string or thread
- Non-toxic craft glue
- Paint brushes
- Holiday-colored acrylic paint
- Glitter
- Clear sealant (optional)
Instructions:
- Prepare your base: create a secure hanging loop by tying string at the wide end of each pinecone. Reinforce with glue if needed.
- Decorate: apply paint to pinecone tips, sprinkle with glitter while paint is wet, and let dry completely. Add a clear sealant if desired to keep glitter in place.
Now, let's explore how to make the pinecone reindeer ornaments.
Materials needed:
- Clean, dried pinecones
- Strong string or thread
- Non-toxic craft glue
- Small twigs
- Felt pieces (brown, black, white, red)
- Scissors
- Googly eyes (optional)
Instructions:
- Prepare your base: attach a hanging loop to the wide end of the pinecone using string and glue.
- Create the features: add twigs for antlers at the narrow end, then attach felt pieces for ears underneath. Create the face using either felt cutouts or paint for eyes and a red nose.
Both styles can be mixed on your Christmas tree for a charming blend of natural and whimsical decorations. They pair beautifully with traditional ornaments while adding a handcrafted touch.
Love crafting with natural materials? Learn how to make your decorative elements last longer with our guide to flower preservation.

How to create pinecone-shaped candles
Transform dried pinecones into unique, naturalistic candles that add warmth and seasonal charm to your home decor.
Materials needed:
- Dried pinecones
- Candle wicks
- Candle wax (white or colored)
- Candle dye (optional)
- Double boiler or wax melting pots
- Plate or newspaper for drying
- Scissors
Instructions:
- Prepare your wicks: tie a candle wick around the top of each pinecone. Make a knot close to the pinecone, leaving about 2-3 inches of wick above for lighting.
- Melt the wax: set up a double boiler system with separate pots for different colors if desired. Melt the wax and add any desired dyes. Let cool slightly to avoid burns while remaining liquid enough to work with.
- Create your candles: Dip each pinecone into the melted wax, holding it by the wick. Then, submerge until the wick's knot is covered and repeat dipping process for thicker layers. Finally, reheat wax if it becomes too cool to work with. Let excess wax drip off between dips
- Set and finish: place candles on newspaper or a plate to dry completely. Once set, carefully remove from drying surface.
The more layers you add through dipping, the longer your candle will burn. Ensure each layer dries slightly before adding the next for the best results.

How to create a pinecone Christmas wreath
Create a festive door decoration that combines natural elements with holiday charm. This wreath makes an elegant welcome statement for the season.
Materials needed:
- Dried pinecones
- Natural elements (twigs, dried leaves, dried flowers)
- Wreath base (store-bought or homemade from cardboard)
- Strong glue or silicone adhesive
- Decorative ribbon or bow
- Twine or eyelet for hanging
Instructions:
- Prepare your base: start with your wreath form, either purchased from a craft store or created from sturdy cardboard. Ensure it's strong enough to support your decorations.
- Create the design: begin by gluing pinecones sideways around your wreath base. Keep them in their natural state for a rustic look, or paint them if desired. Fill spaces between pinecones with twigs, dried leaves, and flowers to create fullness.
- Add finishing touches: attach a festive ribbon or bow to your wreath. Create a secure hanging loop using twine or an eyelet at the top of the wreath.
For the most natural look, leave pinecones undecorated and choose ribbon colors that complement their warm, woody tones. Arrange elements in a balanced pattern around the wreath for professional results.
Move from winter to spring crafting. Learn how to preserve tulips' elegant shapes and colors for long-lasting natural decor.

If you want to read similar articles to How to Make Christmas Decorations Using Pine Cones, we recommend you visit our Using recycled materials category.